Come promesso ecco i dettagli del mio progetto per il salotto, è un IKEAHACK per 3 motivi:
· perché combina strutture e cassetti della serie Stuva (profondi 50 cm, 10 cm più del Besta!) e ante della serie Besta Vassviken e Glassvik;
· perché nella parte sinistra del mobile le ante Besta non sono montate con cerniere ma usate come frontali, cioè attaccate direttamente ai cassetti Stuva, spingendo l’anta si apre anche il cassetto più basso;
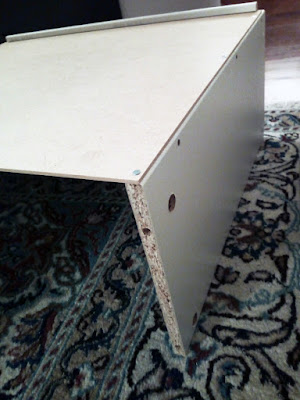
· perché ho fissato un’anta come pannello di copertura sul fianco destro della composizione per dare al mobile un aspetto più uniforme, è bastato accorciarla.
/
As promised here
follow the details of my living room project, it is an IKEAHACK for 3 reasons:
·
combines
structures and drawers from Stuva series (50 cm depth, 10 cm more than Besta!)
with Besta Vassviken and Glassvik doors;
·
on
the left part, the Besta doors are not fixed with hinges but used as drawer
front, fixed directly to the drawer, pushing the door the lower drawer opens;
·
one
door has been cut and fixed on the right end side of the stand as covering
panel, this gives the stand a more finish style.
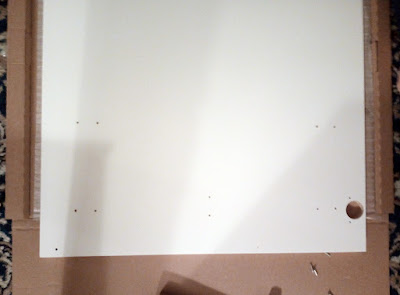
Le predisposizione dei cassetti Stuva e delle ante o frontali Besta NON sono compatibili, ma io ho ovviato con delle semplici staffe a L e accorciando il fondo dei cassetti! Ecco i passaggi:
- montare
il cassetto senza frontale con il fondo già accorciato, e inchiodarlo ai
fianchi
- aggiungere
le staffe ai lati e al fondo del cassetto
- fissare
le guide per cassetto alla struttura senza schiena
- inserire
il cassetto
- posizionare
sul pavimento l’anta e sopra la struttura con la schiena aperta verso
l’alto, proprio come se il mobile fosse già completo e solo rovesciato
- centrare
bene il mobile sull’anta e segnare con una matita i fori delle staffe sull’anta
- rimuovere
la struttura con il cassetto, estrarre il cassetto
- rimontare
la schiena della struttura
- posizionare
il cassetto sull’anta in corrispondenza dei segni e avvitare le staffe
all’anta
Io ho aggiunto le aperture a spinta: spingendo l’anta si apre anche il cassetto più basso, ma anche una maniglia sul bordo starebbe bene.
Ho scelto questa soluzione per le ultime due strutture a sinistra lasciando volutamente una capienza maggiore al cassettone basso, per riporre cuscini, plaid e giochi. Ho aggiunto dei cestelli estraibili, uno per scomparto, per sfruttare anche lo spazio superiore.
/
Original holes and connections of Stuva drawers and Besta doors/fronts are NOT compatible, but I used simple L-brackets and I’ve shorten the drawers bottom to solve! Here the steps:
- once you have shorten the
bottom, assemble the drawer (without front) and nail the bottom to the
sides
- add L-brackets to sides
and bottom of the drawer
- fix the drawer guides to
the structure without back panel
- insert the drawer
- place on the floor the
door and put the structure on the door with the open back upwards, just
like the stand is already completed but turned down
- check the centering of
the structure on the door and mark the brackets holes positions on the
door with a pencil
- remove the structure and
extract the drawer
- add the back panel to the
structure
- place the drawer on the
door referring to the marked points and screw the brackets to the door
I have added the push and pull system: pushing the door, the lower drawer opens, but I think handles on the door upper side can be good.
I’ve chosen this solution in the last two units on the left, leaving more capacity to the lower drawer for pillows, blankets and games.
I’ve added extractable metal drawers, one in each unit, to use also the upper space.
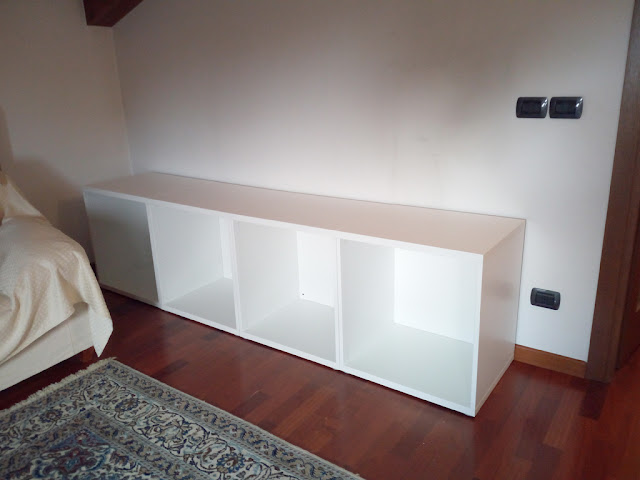
Le 4 strutture Stuva sono fissate fra loro.
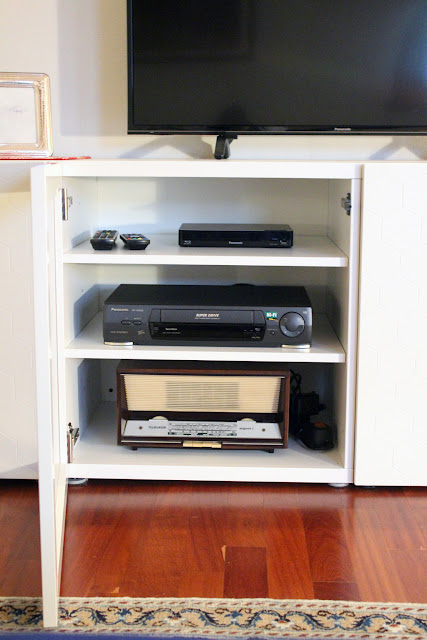
Nella vetrina ho forato la schiena in corrispondenza di ogni ripiano per il passaggio cavi. Volevo fortemente che lettore dvd, videoregistratore e eventuali altri apparecchi fossero protetti dalla polvere; poi ha trovato posto anche la radio d’epoca del nonno!
Nell’ultima struttura a destra l’anta è fissata con cerniere e dentro ho messo solo cestelli Stuva per triplicare lo spazio, qui infatti metterò solo dvd!
Infine ho accorciato un’anta Vassviken e l’ho fissata sul lato destro della composizione, per uniformare l’aspetto del mobile, il tocco finale sarà il vetro verniciato che farà da top, l’ho ordinato su misura con specifici fori per il passaggio cavi./
The 4 Stuva structures are fixed together.
In the glass cabinet, I made holes in the back panel to allow the cables exit. I wished to keep dvd and vhs players far from dust; and I found room for my grandfather’s vintage radio too!
On the last right unit, the door has hinges and inside I preferred to use 3 Stuva extractable metal drawers to store only dvd discs!
Finally I’ve shorten a Vassviken door and fixed it to the right end side of the structure, to give a uniform look; the last thing will be the custom made, white painted, glass top with holes for the cables.
Se volete replicare questo progetto vi servono:
/
Da aggiungere 10 staffe a L , viti e chiodi.
Attrezzi usati: trapano/avvitatore, martello e sega/
Add 10 L-brackets, screws and nails.
USED TOOLS: drill/screwdriver, hammer and saw.
________________________________________________
MOBILE COMPLETO CON TOP IN VETRO QUI
COMPLETED PROJECT WITH GLASS TOP HERE
________________________________________________
MOBILE COMPLETO CON TOP IN VETRO QUI
COMPLETED PROJECT WITH GLASS TOP HERE


Thank you! Come back saturday to see the glass top! :-)
RispondiEliminaI'm so happy to have been helpfull!
RispondiEliminaGood work!